Utilising JWT
Without the JWT, the widget you have created could be shown anywhere. It is especially important that if this widget contains any secret information the JWT should always be verified before rendering content.
If you are not familiar with JWT, please read the docs from jwt.io.
the JWT can be accessed from the widget context, under token -key.
Example flow
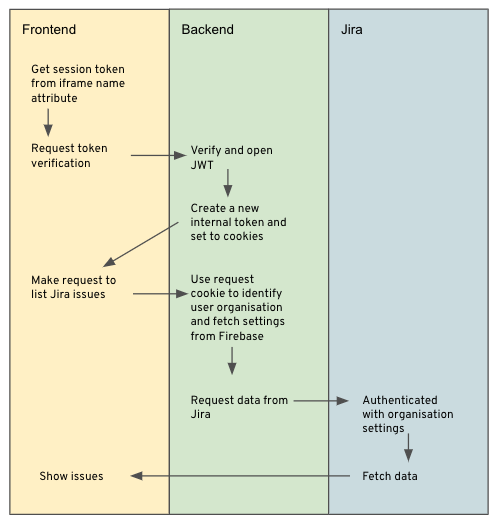
You can find an example repository that runs the Jira issues Custom Widget from our Github repository.
It runs a NodeJS express server in CloudRun and serves a React frontend. The NodeJS provides the API to verify the custom widget token and returns a new session cookie, also based on JWT.
Then when the user request for the Jira issues, we use the new session cookie to authenticate the user and get the users organisation id. Then we can get the Jira settings and passwords for that organisation and fetch the open issues.

Example JWT code
The token string is a JSON Web Token (jwt.io) which you can verify with the shared secret obtained from the Custom Widget setup in the admin panel. Use this secret to verify the token.
Remember to verify the token on your server and not on the frontend code, otherwise you will expose the shared secret.
We recommend not using the JWT we provided as a session cookie for your Custom Widget but to generate your own. This is because the JWT provided has a short lifetime and we may change this at any point.
const jwt = require("jsonwebtoken");

function verifySession(token) {
  try {
    return jwt.verify(token, SHARED_SECRET);
  } catch (error) {
    throw error;
  }
}

const data = verifySession(token);
Updated 9 months ago
